Meet PoYo Agent: turn a creative brief into images and video
PoYo Agent is live. Learn how to describe a creative task, add references, choose models, refine results and reuse project memory, documents and skills.

PoYo Agent is now live: a creative workspace where you can describe a job, let Agent choose the models and steps, and keep refining the results in a conversation. Start with an idea or bring your own references. Use a project when you want to keep the brief, style notes and related conversations together.
A forest scene can become the opening shot of a video. A product photo can become a new campaign image, then a short animated clip. Agent helps connect those steps so you can focus on what the finished work should look like.
What’s new?
- Describe a complete creative task in plain language, including image generation, editing and image-to-video workflows.
- Let Agent choose models automatically, or set preferred models for Image, Video and 3D.
- Attach source files or select existing references from your PoYo asset library.
- Keep project context in memory fields and documents, and reuse instructions through Skills.
- Follow progress, respond when Agent needs your input, and preview or download generated outputs.
The guide below follows the English interface, from your first brief to a project you can return to.
1. Start with the whole creative brief
Sign in and open PoYo Agent. The home screen asks, “What are we creating today?” Enter your brief in the composer, or use one of the example prompts to get started. Choosing an example prompt starts a task, so read it before clicking.
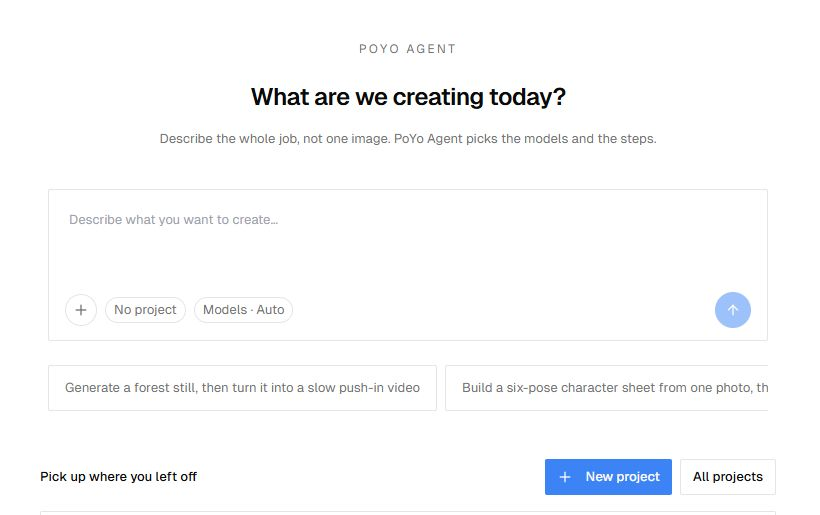
Figure 1. Enter your brief in the central composer. The controls below it let you add references, choose a project and set model preferences.
A useful brief explains the subject, the deliverable and the details that should stay consistent. For example:
Create a cinematic forest still at sunrise, then turn it into a 5-second slow push-in video. Use a 16:9 composition, warm golden light and light mist between the trees. Keep the same scene and lighting in the video.
For a first attempt, keep the job small: one image and one short clip. Add the aspect ratio, duration and visual style when they matter. If you already know which model you want, include that preference or use the model selector.
Leave No project selected for a standalone chat. For work you expect to revisit, choose an existing project or New project. You can also create a project from the home screen before starting the conversation.
When the brief and references are ready, use the arrow button to send the request. Agent begins working on the task; check your spending settings before submitting a generation request.
2. Bring your references and choose your models
Add files from your computer or Assets
Open the + menu beside the composer. Choose Attach files to upload source material, or Assets to find a file already in your library. The same menu also opens the skill picker.
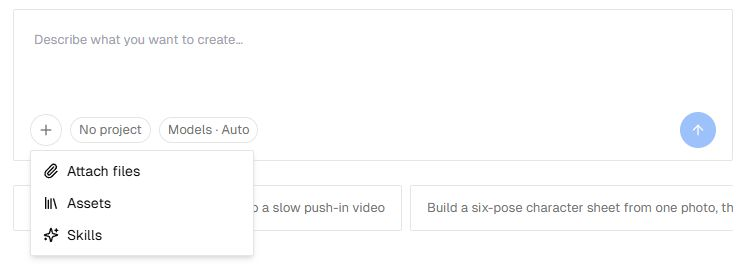
Figure 2. The plus menu brings files, library assets and reusable instructions into the conversation.
In the asset picker, search by name and select the references you need. Check the selected attachments before sending. Explain each file’s purpose in your brief: “Use this image as the product reference” is more useful than attaching an image without context.
Attach source images, video or audio relevant to your task. The model used for a particular step still determines which inputs it can use. Add written briefs and supporting documents through a project’s Memory & docs panel, covered below.
For help organizing source material before you begin, see our PoYo Asset guide.
Use Auto or set a preference
Open Models · Auto below the prompt. Browse Image, Video or 3D, or search for a model by name. You can select a preferred model in each category and return a category to Auto to let Agent choose again.
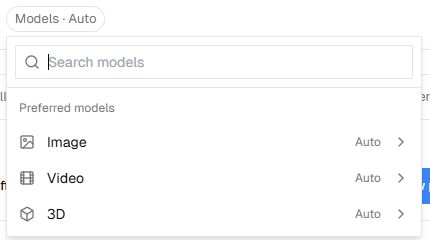
Figure 3. Model preferences are grouped by media type. Auto leaves that category’s model choice to Agent.
These preferences are saved for the active account. Check them when switching to a different kind of job. An image editing model requires a reference image; for a text-only request, choose a compatible text-to-image model or leave the choice on Auto.
3. Follow the work and refine the result
The conversation shows Agent’s responses and generated media. While a task is running, the progress area can show the current stage, step and model. Outputs also appear in the side panel, making it easier to return to a result from an earlier turn.
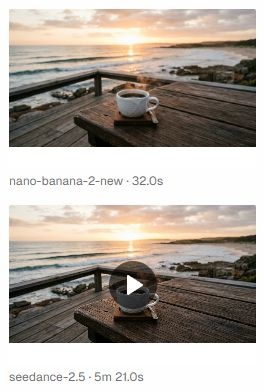
Figure 4. The output panel keeps an image and its video result together. This existing demo uses a seaside coffee scene; the model is listed below each card.
If Agent asks a question, answer it in the conversation. When a Needs you card requests approval for a plan, a step or additional spending, read the request and choose Continue or Stop here. A confirmation request means Agent is waiting for your decision.
Open an output to inspect it more closely, or use its download action to save a local copy. Check details such as the subject, composition and motion before moving on to another generation.
To revise a result, continue in the same chat with a specific instruction:
Keep the forest composition, but soften the sunlight and reduce the mist. Generate a revised still first.
Then, after reviewing that image:
Animate the revised still with a slow push-in. Keep the trees stable and add only subtle movement to the mist.
If there are several results in the conversation, identify the one you mean or attach it again. State both what should change and what should stay the same. When a running task offers Stop, you can use it to end the run; check any already submitted generation in History before starting it again.
4. Keep an ongoing brief in a project
A project gives related chats a shared place for context. Open it from Projects or the recent-project list. Inside the workspace, open Memory & docs to edit Project context. If the side panel is collapsed, expand it first.
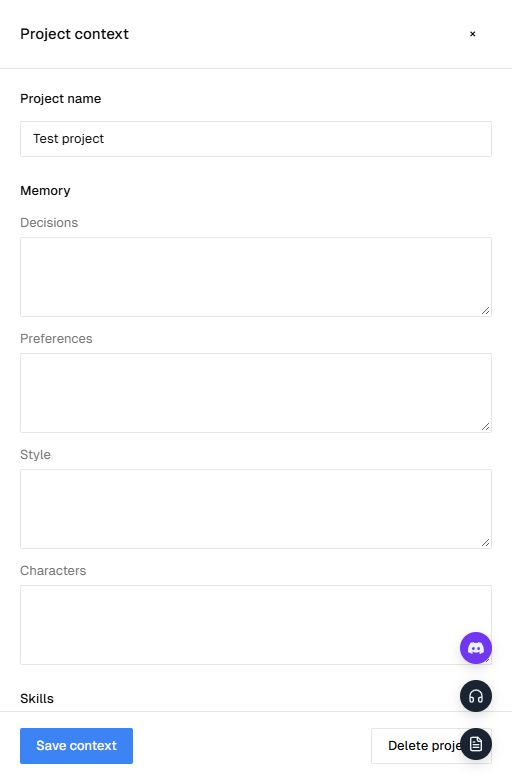
Figure 5. Memory & docs opens Project context. Use the memory fields for reusable direction, then choose Save context.
| Memory field | What to put there |
|---|---|
| Decisions | Approved directions, such as “Use the sunrise forest setting” |
| Preferences | Recurring choices, such as a 16:9 layout or restrained camera movement |
| Style | Palette, lighting, texture and visual references |
| Characters | Defining features that should carry across related images or scenes |
Keep these notes short and concrete. For a forest campaign, a style note could read: “Natural photography, warm early sunlight, muted greens, light atmospheric mist. Avoid neon colors and fantasy architecture.”
The same panel lets you select project skills and add documents. Enter a Title and Text for a written brief, or use Upload file for a supported TXT, Markdown, PDF or DOCX document. Choose Save context after editing memory or project skill selections.
Use New chat within the project when you want to explore another shot or direction with that project’s context. Project notes give Agent continuing guidance; review each output to check that it follows the brief.
5. Turn repeatable instructions into Skills
Skills are reusable instructions for tasks you do often: preparing a storyboard, writing product-image prompts or checking a character brief. Open Skills in the Agent sidebar to browse All, Yours and By PoYo.
Choose Install skill to add your own. You can drop in a Markdown SKILL.md file, or choose Start from scratch and enter a title and instructions.
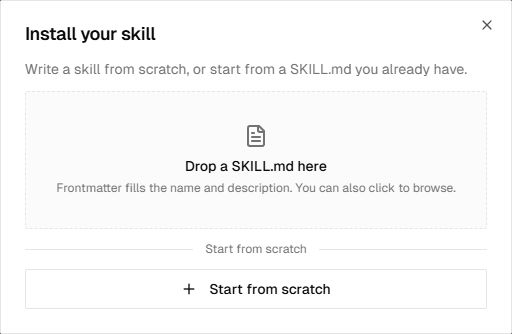
Figure 6. Import an existing SKILL.md or write reusable instructions directly in the dialog.
For example, a skill called “Short product storyboard” could contain:
Before generating, identify the product, audience, visual style and final video duration. Write a compact shot list with framing, action and camera movement for each shot. Keep product colors and defining details consistent. Ask about any missing reference that affects the result.
Select a skill through the composer’s + → Skills menu, or attach it to a project in Memory & docs. Installing a skill adds it to your catalog; selecting it makes it part of the task or project context. You can select up to three skills at a time.
Use project memory for the facts of a particular campaign and a skill for instructions you want to reuse across campaigns.
6. Set your spending cap and keep the outputs you need
Open Settings → Spending caps in Agent. Enter a Safety cap in credits and choose Save. Changes apply to new turns.
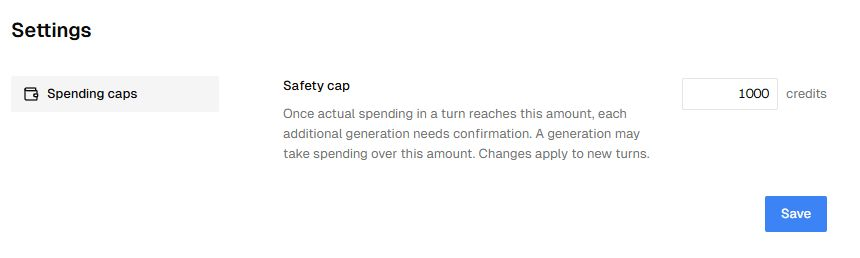
Figure 7. The safety cap controls when further generation needs confirmation. Set it before starting your next task.
The safety cap is a confirmation threshold, not a guaranteed maximum charge. Once actual spending in a turn reaches it, each additional generation needs confirmation. A single generation may take spending over the threshold. Approving the next generation leaves the saved cap unchanged.
If a generation has an unconfirmed outcome, check generation history before retrying. If the account runs out of credits, follow the billing prompt before starting more work.
Download the deliverables you want to keep. For results available in PoYo Assets, check each file’s expiry and use the available retention controls when needed. Keeping a chat or project does not replace checking the media file’s own availability.
Try it on your next creative brief
Start with a single scene: write the brief, add a reference if you have one, and leave models on Auto. Review the first image, ask for one precise revision, then use the version you like as the starting point for a short video.
When the direction works, save its style notes in a project. Add a skill for the instructions you expect to repeat. The next conversation can begin with that context already in place.